Friday, December 14, 2012

Christmas is Creeping Ever closer

Hello!

I passed by one of the classrooms at work today and the teacher has a countdown plaque hanging on her door.  It read "13 Day till Christmas"!  Oh boy!  That's how long it's taken to get to this point in the month and that's not very long at all, folks!  Are you ready?  I'm not.  Getting closer.  We're having a small Christmas this year so only a couple more things to purchase, I think.  I have to pull out what we have so far and make sure things are "fair" if you know what I mean.  Our older two are getting a little taste of what it's like to be grown ups.  Their big gift is that we're putting money into a Roth IRA for them.  Then they'll get a little something or two under the tree.  Yeah.  Not very exciting.  They'll thank us when they're 65 though. ;)

Anyway, I decided give my hand a rest (signing your family name to 75 Christmas cards hurts!) and share a few more Christmas cards that I've made this year.

This first one uses paper and an embossed tag from the We R Yuletide line.  The snowflakes are We R Silhouette shapes.


We R Winter Frost line.  I used the snowflake stamps from the Yuletide collection and clear embossed them on the card base.  The corners are punched with the photo corner punch from We R.  Using the negative shape from those great We R Silhouette snowflakes.


Another negative shape cut from this pretty red woodgrain from Yuletide.


Pulling out the We R washi tape.  The "Christmas" is from a Yuletide stamp set.


Some fun patterns also from the Yuletide line.  I backed the patterned paper squares with the grey card stock that comes with the Winter Frost line.  The letters are old Making Memories.


Same design using  the Winter Frost collection.  It might be hard to tell, but the card stock sticker snowflake is beautifully glittered.


This last one uses a card stock sticker from the Yuletide collection, crochet trim from the Down the Boardwalk collection and woodgrain embossing from Stampin' Up!


Thanks for joining me at the Table today!


Thursday, December 13, 2012

I think it makes them look like punched tin...

Hello!

As promised, I'm back today to show you the card I made using Stampin' Up! Pewter embossing powder.

The card base is Soft Suede and I used the Music Notes wheel in Soft Suede ink for a tone-on-tone background.

The Ornament Keepsakes ornaments were stamped and embossed on Very Vanilla card stock.  Do they look like punched tin to you like they do to me?  So beautiful.

Then I punched a scallop oval and cut some thin strips from the Red Glimmer Paper from Stampin' Up!.  It's awesome that the glitter doesn't flake off at all.


And a close-up of those lovely ornaments.  The pewter color lends itself to a more antique look.  Not bright and shiny like silver but just an elegant look.


See what I mean about how nice that embossing powder works on sentiments?


I have a few more Christmas cards to share so check back soon!

Thanks for joining me at the Table today!


Wednesday, December 12, 2012

Mid-Week Favorites

Hello!

I thought I'd take a little diversion from crafty posts and share a few of my favorite things with you! ....these are a few of my favorite things.....hmm hmmm hmm.  Just kidding.  I think of Sound of Music this time of year because they seem to show it on TV every year on Christmas day or during the week between Christmas and New Years.

Anyway, these things might be crafty related, then again, they may not.  Here we go!

Winter in Utah is not very nice.  The cold doesn't like me and the feeling is so mutual.  The air here is just icky and dry and the skin on my hands, especially around my thumbs starts to crack and let me tell ya, it don't feel good!  

I was recently introduced to this lovely, fabulous, amazing hand cream and I am in love (just don't tell Superman, okey dokey? He might get jealous.....or maybe he might just steal it from me.)  It forms a wonderful protection without feeling greasy or leaving fingerprints on my papers at school.  I am no longer afraid of winter! (okay, well maybe I still am...a little).  


Have you tried this yummy treat?  I have to say I'm not generally a fan of caramel corn and the thought of it mixed in with my beloved cheddar made me twitch a little, but I was assured I would change my tune.  Indeed I did!  You can find this treasure at Costco.  Not sure if it's sold anywhere else, but I imagine it is.  It's just that at Costco you get a nice BIG bag.  Trust me.  Try it.


Next, is this little gem right here:

Can I tell you a secret?  I didn't know what BB stood for for the longest time!  I thought maybe it was the lady's initials that developed the product.  Don't laugh.  I know now what it stands for.

I'm sure I'm not alone when I say that my skin is far from perfect.  Dark marks and old acne scars make for a less-than-flawless complexion.  I don't like to wear foundation because no matter what kind I've tried, I feel like I'm wearing an oily mask.  Ewww!  Enter the best foundation/moisturizer I've tried.  This by no means makes my skin look air-brushed or model perfect but it looks soooo much better than when I don't wear anything and I seriously forget I'm wearing it because it's just so darn light.


Here's another beauty-related favorite:

I have to say my eyes are my favorite feature.  Maybe because they never gain weight ;) and I'm always looking for something that emphasizes my eyelashes.  I don't have super long, thick eyelashes but I have been known to receive a compliment or two when I wear this mascara.  What I like about it is it doesn't clump nearly as much as my former pink and green favorite.  And it does make my lashes look longer.


Last but not least, is crafting related:

I've been using this embossing powder from Stampin' Up! on a few Christmas cards this year.  Swoon!  I bought it last year but never opened it.  What was I thinking?!  I especially love how it looks against brown card stock.  I'll post a card tomorrow in which I embossed some ornaments with this beautiful embossing powder.  They look like punched tin.  So cool.  It's also fine enough that you can use it on sentiments with lovely results.


Well, there you have it.  My 5 current favorites.  I know.  You really wanted to know.  But maybe you did ;).  Who knows, you might develop a new favorite yourself!

Don't forget to join me tomorrow when I show you that Pewter embossing powder in action.

Thanks for joining me at the Table today!


Monday, December 10, 2012

Use Your Scrapbooking supplies for Packaging!

Hello!

Can you believe we're in the double digits of December already?!

You probably have at least started your Christmas shopping.  And if you haven't, get going!  Once you bring those special, well thought out gifts home, you want to wrap them up in pretty packing, right?

I created some fun and festive packaging using your paper crafting supplies.

On this first package, I took some brown wrapping paper I got at Target and stamped the snowflakes from We R's Yuletide line in Stampin' Up! Soft Suede ink.  Then I wrapped the box and brushed the ink around the edges of the box.

Next I took papers from the Storytime, Red, White & Blue, and Yuletide collections (All We R Memory Keepers), cut them into banner shapes and sponged them with the same brown ink.  After I glued everything to the package, I tied it with some We R baker's twine.


And a close-up of the tag.  I used one of the embossed stickers from the Yuletide line and stamped another snowflake from the stamp set.  We R stamps are really high quality.  I always get great images from them.  They aren't going to make them anymore, so if you want to get your hands on some of their stamps, hurry!

Next, I wrapped this package with plain white paper.  Then I placed a border sticker smack dab in the middle.  I love that it fit perfectly across.  Then I took an embossed wreath tag from the Yuletide collection and adhered that to the middle of the package.  To embellish it even further, I made an accordion flower out of some of the Yuletide paper and used one of the embossed chipboard tag stickers.  You can't really tell, but it's embossed with silver foil.  So pretty!  I, again, used baker's twine to put it all together.


And a close-up of this tag.


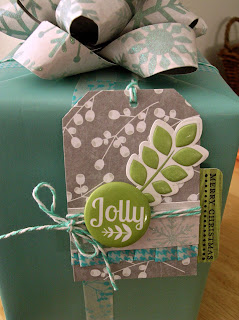
Last, but not least, is the blue package.  I started with some plain blue paper, then embellished the box with some coordinating washi tape and baker's twine.  The tag was made from a scrap of Winter Frost patterned paper.  I love the gray with the white berries.  I used my Angle Corner Chomper (from We R) to turn it into a tag shape.  Then I added We R washi tape, patterned paper, baker's twine, and a sticker and mini badge from the Yuletide line.  To finish the tag, I punched a tab with my Tab maker punch and the green woodgrain paper from the Yuletide line.  And stamped a sentiment from Stampin' Up Teeny Tiny wishes.


But the thing I'm most excited about this package is the handmade bow.  I took strips of double sided patterned paper from the Winter Frost line (this particular paper has glittered snowflakes on one side.  I love).  Then I looped and stapled them and adhered them all together.  Here's the tutorial I used, if you'd like to make your own.   This was my first attempt and I wasn't disappointed.  It was actually really fun.  The tutorial uses magazine paper, and that would probably be a little easier to manipulate but using the thicker patterned paper worked well, just the same.  Super easy and really cute when you can customize them with patterned paper of your choice!


 I hope that gave you some inspiration to make your packaging as special as the gift inside. :)

Thanks for joining me at the Table today!

Friday, December 7, 2012

More Christmas cards

Hello!

How about I share a couple more Christmas cards?

This first one is also based on a Pin on one of my boards.

Here's the pin photo (I've seen this photo pinned so much. Gorgeous!):


And here's my card:


The wreath is from a Close to My Heart stamp set that I got in my box of Paper Crafts Stamping Royalty goodies, the Kraft alphas are an old set from Making Memories and the stamped chevron strip down the center and the pearl are from Stampin' Up!

And here's the next card:


I love silver for Christmas so I embossed the sentiment with silver embossing powder.  The snowflake is a Silhouette shape from We R Memory Keepers.  The silver accents are Liquid Pearls from Ranger.  I love how it looks like liquid metal even when it's dry.  Simple yet classy.

Come back Monday and I'll share some fun ways to dress up your Christmas packages using the scrapbooking supplies you have in your stash!

Thanks for joining me at the Table today!

Wednesday, December 5, 2012

Pinterest Party....Pin turned card

Hello!

I am in love with today's card.  And not because I made it, but because it turned out better than I saw it in my head.  That doesn't happen very often, but when it does I do a happy dance.

My inspiration pin is a Christmas decor idea and when I saw it, I knew I wanted to try to translate it into a card.  So okay, here's the Pin:


What I liked most about it was the distressed blue/green wood, and the white star garland.

Here's the card I came up with:


It might be a little hard to see but after I stamped the woodgrain on the card stock, I scored it using my Simply Scored tool.  Then I sponged in certain spots to bring out the scoring.  It looks really cool in real life.  I also used the Simply Scored to make the stars look a little more 3D.  The Christmas tree was made with the Pennant builder punch and then stamped with one of the hearts from I {Heart} Hearts stamp set.  All supplies are from Stampin' Up!, although a few are retired.

I'm not sure yet who'll I'll give this to.  It took a while to complete so it's going to have to be someone pretty special who receives it.  Right now it's on my inspiration board because it makes me happy just to look at it.  Someone might have to wait till next year to be the recipient. ;)

Thanks for joining me at the Table today!

Tuesday, December 4, 2012

Christmas Greetings

Hello!

I've been working frantically the last 3 weeks to make Christmas cards to sell at work.  I love scouring Pinterest and my magazines to find fun ideas.

Here are a few I've made:


These all use the Yuletide line, Washi tape, and tab punch from We R Memory Keepers.

I'll be posting a lot more cards during the month using lots of different products, so please come back and visit!

Thanks for joining me at the Table today!

Monday, December 3, 2012

I'm Back....and boy do I have a lot to say!

Hello!

Welcome to the month of Christmas!

The older I get, the more lazy relaxed I get about the Holiday goings on.  I love to think each year will be the year that I have the magazine Christmas tree.  Usually it doesn't happen and I'm totally fine with it.  But each year (after Christmas) I get a few more ornaments in the style and color I'm going for so one year I'll get there.  And I'm sure I won't be any happier than I am already.  It doesn't have to be perfect.  We also drink lots of hot cocoa during December.  I'm drinking some right now, as a matter of fact.  With a dash of cinnamon.  Yum!  Cocoa makes everything better.  Especially when topped with whipped cream, yes?

Yes, Christmas is pretty special at our house.  I may have told you this before, but one year, Superman and the kids secretly put up and decorated the Christmas tree BEFORE Halloween!  Yeah.  I wasn't very happy about that one.  I like each holiday to have it's own celebration, people!  So it really ticks me off when Thanksgiving pretty much gets the brush-off in the retail world.  I mean like REALLY.

So anyway, now that Thanksgiving is over, I can say that I'm ready to get the Christmas season underway!

How about a simple, yet cute, neighbor gift idea?  This would also be a fun teacher gift if you're looking for ideas for that.

A year or two ago, I stumbled upon a candied almond recipe that sounded too tempting not to try.  And try I did.  With success!  It's so easy, but tastes very gourmet.

Let me tell you, if you make this (and you most definitely should), while the almonds are roasting in the oven, your kitchen will smell like Christmas at the mall!

So here's the recipe: (and don't complain to me when you gain 5 pounds in an hour because you just can't stop eating them!)


Candied Cinnamon & Sugar Almonds (makes 2 cups)
1 egg white
1 tsp cold water
1/2 tsp pure vanilla extract
2 cups unsalted whole almonds (I get the big bags at Costco)
1/2 C packed light brown sugar
1/4 tsp salt
1/2 tsp cinnamon
Preheat oven to 250 degrees. Line a large (11x17") rimmed baking sheet with foil and lightly spray with cooking spray.
In a large bowl, beat the egg white until stiff peaks form (about 4-5 minutes). Add the water and vanilla and beat again until stiff. Add the almonds to the mixture and stir gently to coat the almonds with the egg white mixture.
In a small bowl, mix the brown sugar, salt and cinnamon. Add this mixture to the almonds and stir gently to mix well.
Pour the almonds out onto the prepared baking sheet and carefully spread them out into a somewhat even layer. Place the baking sheet in the oven and bake for about an hour, stirring/flipping every 15 minutes, until the almonds look and feel dry.
To check to see if the almonds were done, I carefully picked one up in my fingers and when I pressed around it, I didn't get any wet sugar on my hands. The coating on the almonds felt hard and crunchy.
Cool completely before serving or packaging.
NOTE:  While these are super delicious the day you make them, they're even more delicious a day or two later, provided they last that long!

Now how about a card and cute packaging to go along with your delicious almonds?
The card started as a We R Memory Keepers stocking shape in the Silhouette store.  I copied and pasted the shape and made a card base out of it.  Then I cut the front out again using patterned papers from the Yuletide collection.  I embellished it with a crochet doily from the Yuletide line, Stickles, and a stamped label from Stampin' Up Itty Bitty Banners.


The packaging is just a leftover mini paint can that once housed some chipboard alphas.  I just decorated it using We R/Silhouette snowflake shapes and the Yuletide paper, plus some ribbon (you can see the lid a little better in the photo above).  I cut thin, thin strips of patterned paper, crumpled them up, and placed them in the bottom of the can. Then I placed a few of the almonds in a cellophane bag and tucked them safe and sound inside their pretty new home.


So there you have it.  A simple yet delicious gift and I tell you, if you give these this year, you'll be a favorite on everyone's list!
Check back tomorrow when I show some of the Christmas cards I've been working on lately.
Thanks for joining me at the Table today!